
Maintenance of the Apeks First Stage T20/US4 Non-Turret DIN
A WORD OF CAUTION: This plan is for academic study only and is not complete. It is unsafe to service any regulator without APEKS factory training and certification. The reader assumes all responsibility for safety and safe use of what they choose to service, even after training. Safety means you make provision to protect yourself from injury of any kind. This article is not a replacement for APEKS factory training and their course of instruction on SCUBA regulators. I am not advocating the service of any SCUBA regulator by someone who is not trained and certified in such practice. This article is nothing more than a story about APEKS regulator overhauls and insists that you, the reader, NOT undertake such a task.
Introduction:
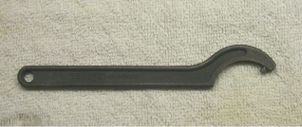
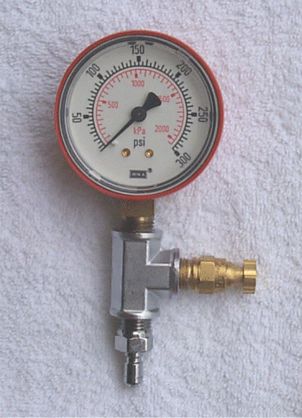
Before I began to overhaul my regulator, I needed some special tools and a rebuild kit. Some simple tools I already had, like metric allen wrench’s, vice with soft jaws, and dentist’s pick. The special tool’s required were an IP (Intermediate Pressure) gauge (below right), 40-42 mm spanner wrench (below left), and ultrasonic cleaning machine. Most regulator mechanic’s have a flowbench which includes IP and magnehelic gauges. The magnehelic gauge is only required for the second stage rebuild so will not be discussed here. The IP gauge was used to determine the output pressure of any low-pressure (LP) port. For this job, it was necessary to set the IP pressure to about 130 PSI, and this is discussed further later in the story. For the Inspiration rebreather the IP is set conform the fabric manual’s values.
Someone brought to my attention that a good source of tools for regulator repair is www.scubatools.com – Although this article covers the T20 model of 1st stage regulator, they do have tools especially designed for other APEKS models. The tools I am referring to are:
PN 20-235-200, Hook spanner $12.50
This is a hook spanner made from aluminum which will not mar the TX100 regulator housing.PN 20-236-200, Cover Tool $10
This is a custom spanner made from aluminum which will remove/install the cover on the TX100 regulator.
In addition, they have all sorts of other neat tools designed for regulator repair that you will not find anywhere else! Check this stuff out!!
www.scubatools.com/Universal.html
www.scubatools.com/PBUniversal.html
www.scubatools.com/Bench.html
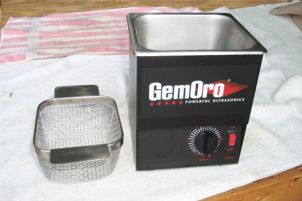
I have been told that its not necessary to use an IP gauge and there are methods to get around not using one, but thought it best to use one to ensure the accuracy and safety of my job. These issues are documented in Vance Harlow’s SCUBA Regulator Maintenance and Repair, available from Airspeed Press, a good how-to text. The only downside to the manual is its generality. However, it does contain a schematic for the APEKS, an invaluable piece of reference material. Also, some suggested that an ultrasonic cleaner was not needed and proposed using a simple tooth-bush and vinegar for cleaning. I have found that a tooth-bush does not do as thorough a job since its impossible to get the brush inside every nook and cranny of the regulator. I ended up using the ultrasonic cleaner and was very pleased with the results.
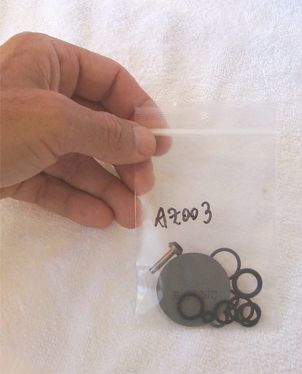
A rebuild kit contains the O-rings and high pressure (HP) seat you need to complete this job. I was not discouraged about purchasing the rebuild kit. They can be obtained, but realized persistence was necessary in this regard. I knew of several shops that would sell them, but was careful. Some shops thought they are doing me a favor and attempted to charge an outrageous price. Kits should sell for somewhere between $20-$40 depending on the kit supplier. Purchasing these kits has not been made easy, and it all goes back to the attitude by professionals that the average person on the street can’t do this job or even be allowed too. In fact, it has been poor workmanship by shops which forced me to undertake this task myself. If you already have a good and reliable mechanic that you can trust, then I would recommend you stick with them. They are worth their weight in gold! For many years I had a shop that did a great job for me, but their mechanic eventually left and then I was back to square one. It was then that I worked out the details for this overhaul myself and decided to write a story about it. I am not advocating you undertake this task yourself, but rather locate a good professional mechanic and let them do it for you.
Definition:
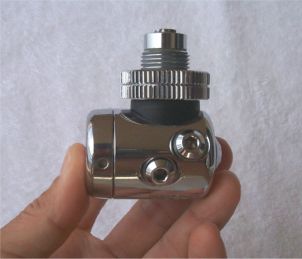
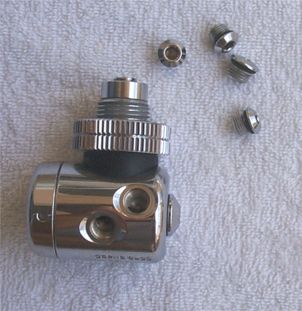
LP and HP side of the regulator – Examine the photo, top right side of this page and notice its orientation. The left side of the photo shows the LP side of the regulator, and the right side shows the HP side. References will be made to the regulators LP and HP side, especially concerning the sequence of assembly and disassembly, e.g., disassembly starts with the LP side. Re-assembly begins with the LP side. Make sure you understand what side is which!
Note:
This article documents the most simplest version of the APEKS family of regulators. If you have for example, the cold water version of the described regulator, or have the turreted version, the differences are minor. More information about the differences are documented in Vance Harlow’s SCUBA Regulator Maintenance and Repair Manual discussed (above).
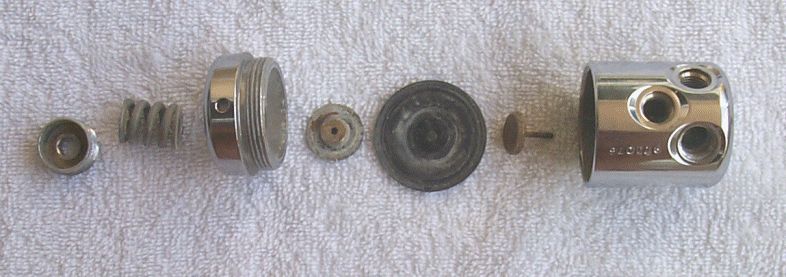
Parts (left to right): spring adjuster, spring, diaphragm cap, spring carrier, diaphragm, valve lifter, regulator housing
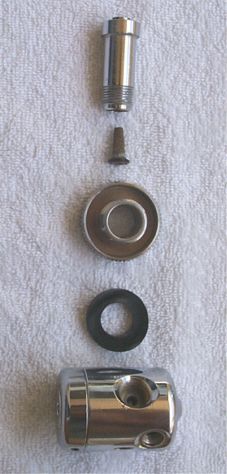
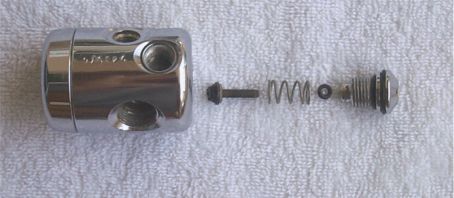
Parts (left to right): regulator housing, HP valve seat, spring, O-ring, balance plug with two O-rings
Step Five:
Finally, I cleaned the metal pieces and replaced the parts from the rebuild kit. After I had gotten this far, I figured the rest was easy. As suggested above, I began by simply cleaning the metal pieces and replaced the worn out parts from the rebuild kit. In the interest of avoiding a long winded explanation, I will just state a number of especially important items that went into my notebook for future reference:
- Remember, disassembly and re-assembly begins with the LP side
- The regulator housing and various metal parts are manufactured to close tolerances, especially where the HP seat mates to the regulator housing. Be extremely careful not to go poking around with a dentists pick and destroy or scratch the metal inside the housing. A good way to remove the diaphram for example, would be to send a blast of air through one of the low pressure ports after removing the diaphram cap rather than using a dentists pick.
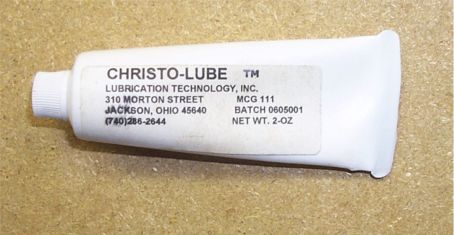
- Be careful how you go about lubricating the O-rings and springs. For example, some persons have told me that on the HP side of the regulator, you should only use oxygen compatible (Christo-Lube or equivalent) lubricants. On the LP side, this is not an issue since its high-pressure and oxygen that causes problems, not low-pressure (<300 PSI). However, when I discussed this issue with several other knowledgeable persons, a factory trained person had this to say:
“Most regulator manufacturers these days are using Christo-Lube for every regulator, O2 clean or not, because of it’s superior lubricating qualities. Zeagle, Apeks, Atomic, and Oceanic are a few off the top of my head which are using strictly Christo-Lube so their official word is going to be use it in the whole regulator whether it’s O2 clean or not. Apeks in particular, since that’s what we’re talking about, sells an O2 compatible conversion kit in which ALL O-rings are viton, both for HP side and LP side so it would stand to reason that they would recommend O2 compatible lube on both sides as well even if they weren’t using it already. Fact is, as you know, you don’t have the “O2 risk” at low pressure (<~300 psi) so silicone should be ok, but some of these manufacturers claim to have a measured increase in performance with Christo-Lube, so I use it everywhere. Due to liability fears, I don’t think ANY manufacturer is going to say you can use silicone grease on a regulator being cleaned for O2 service.”
www.lubricationtechnology.com or even better www.scubatools.com/Universal.html
- When you do apply any lubricant, use it sparingly. Do not gum up the works by over-lubricating anything.
- On the LP side of the regulator, I used my choice of lubricant where there was metal to metal. For example, I put a light coating on both sides of the spring where it mates to the spring adjuster and spring carrier. I also put some on the threads of the spring adjuster.
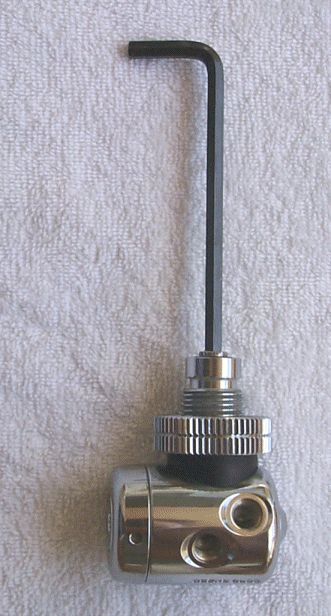
Step Six: Adjusting the IP
OK, now that I had cleaned and re-assembled the regulator, the last step was rather simple but does require one of the special tools, the IP gauge. At this time it was necessary to adjust and set the output pressure of the LP ports. The LP ports should put out 130 PSI, give or take a few pounds depending.
(Inspiration users; check your manual for exact data!)
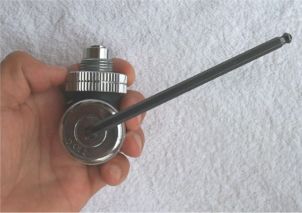
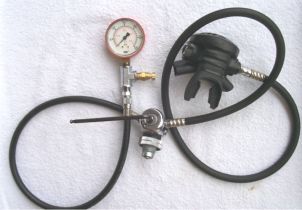
Photo (above left) demonstrates how the IP pressure is adjusted by turning the spring adjuster using an allen wrench. Photo (above right) shows how you actually set up the configuration of IP gauge, regulator, and hoses when you are about to actually make the adjustment, with the exception of the 1st stage not being attached to a cylinder. Notice that there is a 2nd stage regulator attached to the 1st stage housing. This is done as a buffer should the pressure coming out of the LP port exceed the maximum rated capacity of the IP gauge. In other words, if you supply gas to the 1st stage and the LP port puts out more than 300 PSI, then you might blow the IP gauge! The 2nd stage can prevent this from happening because it will release this excess pressure. However, I took all precaution to ensure this scenario did not happen.( Inspiration users; The first stage of the oxygen site of the rebreather is equipped with an overpressure valve, therefor the need of using a second stage is not necessary!
Lastly, I learned about something called drift pressure from studying reference materials and the SCUBA Regulator Maintenance and Repair Manual described earlier in the story. Drift pressure is the tendency for the LP output to deviate by a few pounds of pressure once the final adjustment has been made. In other words, you set the IP to 130 PSI, turn off the SCUBA cylinder supplying pressure, and then turn it on again. You notice the LP port goes to 130 PSI immediately, but then after a few seconds, the output PSI “drifts” slightly higher by a pound or two. This is considered normal LP port output behavior as the high pressure seat and other inner workings of the regulator seek equilibrium.
(Inspiration users: Check the IP frequently, specially after this overhaul!)

Therebreathersite was founded by Jan Willem Bech in 1999. After a diving career of many years, he decided to start technical diving in 1999. He immediately noticed that at that time there was almost no website that contained the history of closed breathing systems. The start for the website led to a huge collection that offered about 1,300 pages of information until 2019. In 2019, a fresh start was made with the website now freely available online for everyone. Therebreathersite is a source of information for divers, researchers, technicians and students. I hope you enjoy browsing the content!