

Homebuild X-ray MCCR by Alexey Konovalov
“X-Ray” Rebreather Project“
With the development of the diving devices “Atlantis”, “Dolphin” and “Ray”, the Dräger company produced a series of legendary semi-closed rebreathers for the sports sector. Although their production ended almost two decades ago, these devices have still not disappeared from the scene. The low purchase price of used scuba units, their simplicity and the still high availability of spare parts have made Dräger rebreathers very popular among hobbyists. This article is about one such conversion of a Dräger “Ray” into an mCCR ( amusingly called an “X-Ray”).
However, it should be made clear from the beginning that this hobby project is carried out by an amateur at his own risk. I am therefore only describing my approach here without guaranteeing the correctness or safety of the technical solutions adopted. As a KISS-style rebreather is not an innovation in itself, the focus of this article is on explaining the reasons why the result is the way it is. Normally, no manufacturer would talk openly about the development process of their devices. The reader is assumed to have a knowledge of how rebreathers work and the basic concepts.
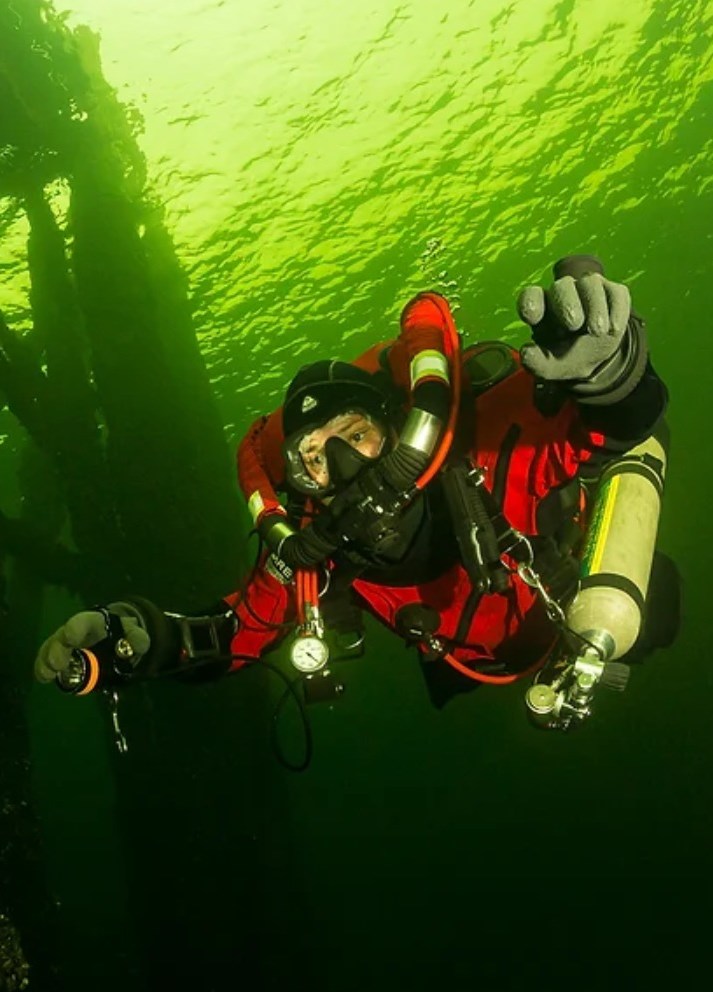
Diving with the almost unchanged Dräger “Dolphin”. Photo: Jens-Uwe Lamm
The motivation behind the project
I started rebreather diving in 2016 with a Dräger “Dolphin”. In addition to the fascination for this technology as such, there were also objective reasons for the change. A compact, reliable and robust device was to enable multi-day wreck diving in the Baltic Sea at nitrox depths away from any filling logistics and from on board very small boats. The second area of use was the cramped diving chamber of the research submarine “Euronaut”, on which I worked and travelled between 2009 and 2020. Before my time, there was another project for the same purpose called EXIVE. “Dolphin” performed its tasks well for over 170 hours. But there were also points of criticism. First and foremost, the diving depth was limited by the nitrox mixture, gas consumption was typically high for a semi-closed rebreather and there were a few comments on comfort and ergonomics that were specific to my taste. These include the lack of a stand and crotch strap, a sub-optimal position of the D-rings for carrying stages and somewhat difficult access to the internal components. There are already various more or less professional solutions for each of these points, but the result loses the charm of what was originally a very compact and handy device. So it was time to look around for alternatives.
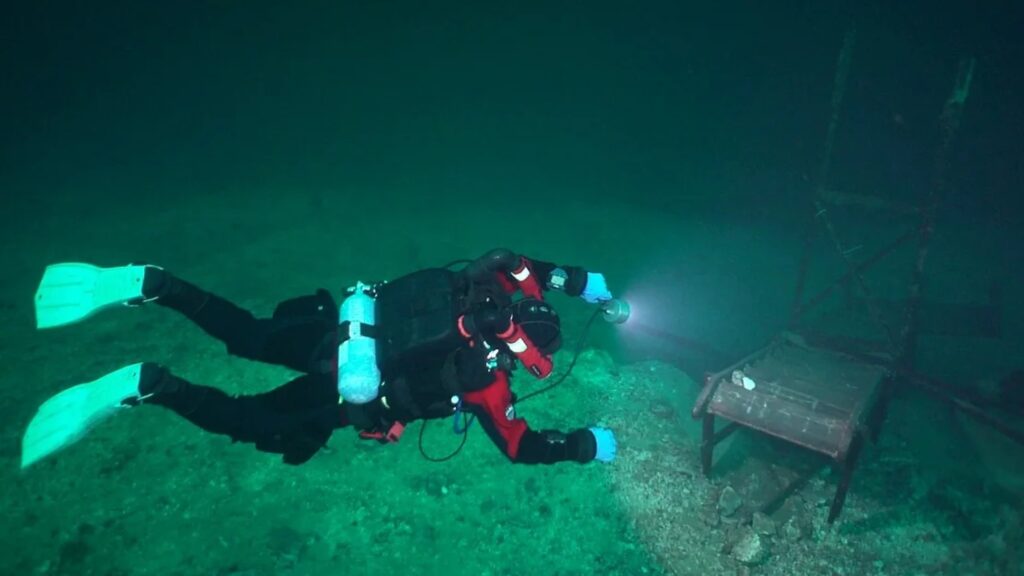
“X-Ray” Mk.1 Photo: copyright Frank Aron
Requirements
As with any technical development, the first thing you should be clear about is what the rebreather must be able to do. The following requirements were defined:
– Because of the gas efficiency, it had to be a CCR. Although SCR solutions with gas exchange were also considered in the early days, they were rejected.
– The primary deployment targets were the wrecks in the western Baltic Sea and the North Sea, which meant typical diving depths of up to 40 metres. Trips to greater depths were also to be expected, but only in the double-digit depth range given the level of personal training and preferences.
– The equipment should be modular so that you only have the essentials with you on trips. Ideally, everything from pure oxygen to trimix should be possible.
– The planned dives should typically take place from on board small RIBs or rigid hull boats between 5 and 8 metres in length. This led to the need for equipment that was as compact and lightweight as possible. Funnily enough, some skipper friends don’t even allow double devices on board, which is an indirect statement about the target weight of the rebreather.
– It would be even better if the device could fit into sports luggage when flying.
– The ability to disassemble it into several handy parts should make it easier to load and unload. This also included pushing it through the narrow entry shaft of the submarine.
– The rebreather had to be put down in the water occasionally and lifted into the boat by hand.
– The device should remain manageable under and above water even in swell or currents. When diving in the North Sea, there are only short windows of slack water available. You must therefore not be “preoccupied with yourself” during this time. Due to the current, it was necessary for the configuration to offer as little resistance to the current as possible.
Almost all of these requirements could be easily realised with a sidemount or chestmount rebreather. They are lightweight, modular and allow flexible adaptation to the respective diving conditions. What’s more, they are
developed for confined spaces and therefore allow comfortable wreck penetration.
I had no experience with chestmount rebreathers at the time and, in my opinion, sidemount devices have a decisive disadvantage on the open sea: they cost too much time on the surface. With a sidemount rig, the time problem grows exponentially with each additional stage, especially if the device itself is treated like another stage. I wasn’t familiar with solutions like KISS sidewinders back then. The usual overboard jumping was also less comfortable than with backmount devices. Ultimately, everything can be practised, but sidemount diving was primarily developed for shallow water and caves. That’s why I favour a universal backmount rebreather for wreck diving.
When looking at the market, most CCRs were ruled out due to their size and weight. Although there were also very small models that were suitable for travelling, these were mostly complex and correspondingly expensive eCCRs designed for great depths. No rebreather manufacturer for the tech market would invest tens of thousands of euros in the development and certification of devices that would not even reach the 100 metre mark afterwards. What remains is an in-house development customised to personal requirements, which leads us to the next question: Do you start from scratch or do you modify something you already have? And if it is to be a modification, which device is best suited as a development platform, or what would have to be changed?
In my case, these questions were easy to answer. In 2017, I had the opportunity to spend two weeks diving on Greek wrecks with a Dräger “Ray” and immediately fell in love with the device. It was even more compact and easier to use than its big brother, the Dolphin. And, hand on heart, the ingenious industrial design by Dina Gallo created an appearance that is as functional as it is aesthetic. To this day, the “Ray” stands out visually from all the others. Especially its red edition. Now the “Ray” was even more limited in its capabilities than the “Dolphin”, as the standard version could only be dived with a 50 nitrox to a maximum depth of 21 metres. Furthermore, the design of the device (no hard shell or frame) made it much more difficult to modify than the “Dolphin”. All the more reason to take on this challenge. And since Martin Tolksdorf’s “eRay” eCCR at the latest, I knew that a lot was possible with this platform. In addition to the “eRay”, more than nine other “Ray”-based craft projects served as inspiration.
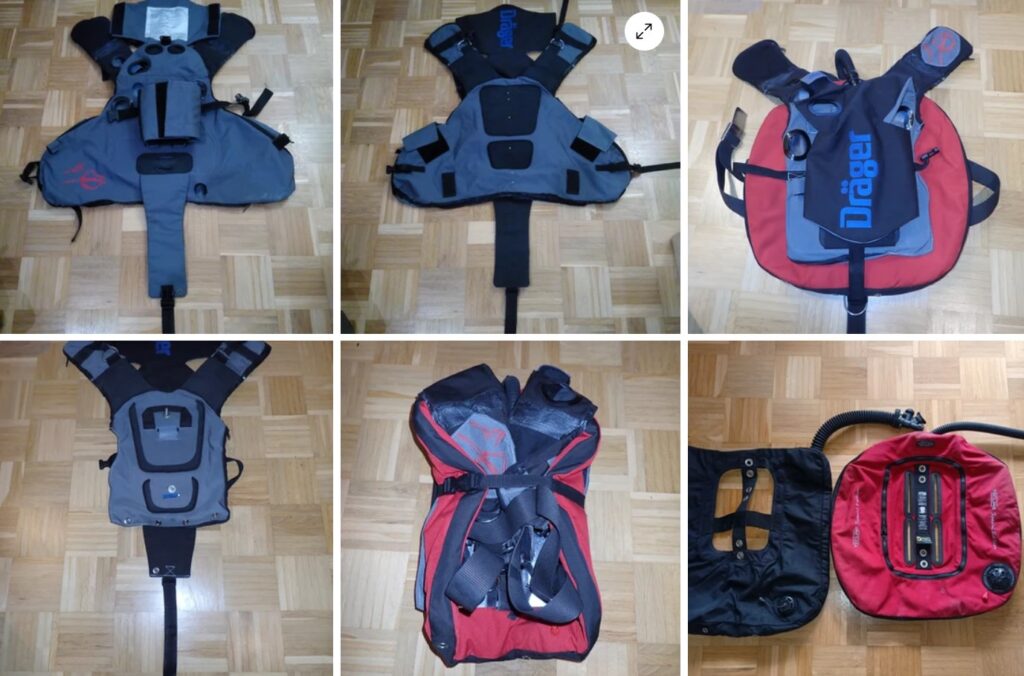
The frame
The special feature of the design of the Dräger “Ray” was a fabric jacket in which all the essential components were integrated: BCD, counterlung, back padding, harness, cylinder belt and scrubber attachment. There was no backplate. It therefore resembled a conventional sports BCD with the corresponding disadvantages:
– Although the device was very light, it ensured that even in the sea with swimming trunks and an average build needed the first 8 to 9 kilos of lead.
– The amount of weight and the transverse Nitrox bottle in the lower back area made for a very stern-heavy water position.
– As with the Sport BCD, the buoyancy compensator was fitted in the stomach and lumbar area, which did not improve the water position.
– The original jacket had no load-bearing D-rings for attaching stages. The retrofit tended to overstress the fabric in the long term.
In most “Ray” conversions, the problem of weight distribution was either not addressed at all or was minimised by arranging gas cylinders parallel to the scrubber in the traditional way. This led to a new development of a fixed frame and an enlarged device cross-section. For this reason, the original component arrangement on the soft frame was retained for the “X-Ray”. At the same time, the aforementioned shortcomings of the jacket optimised for recreational diving made a conversion to a backplate indispensable.
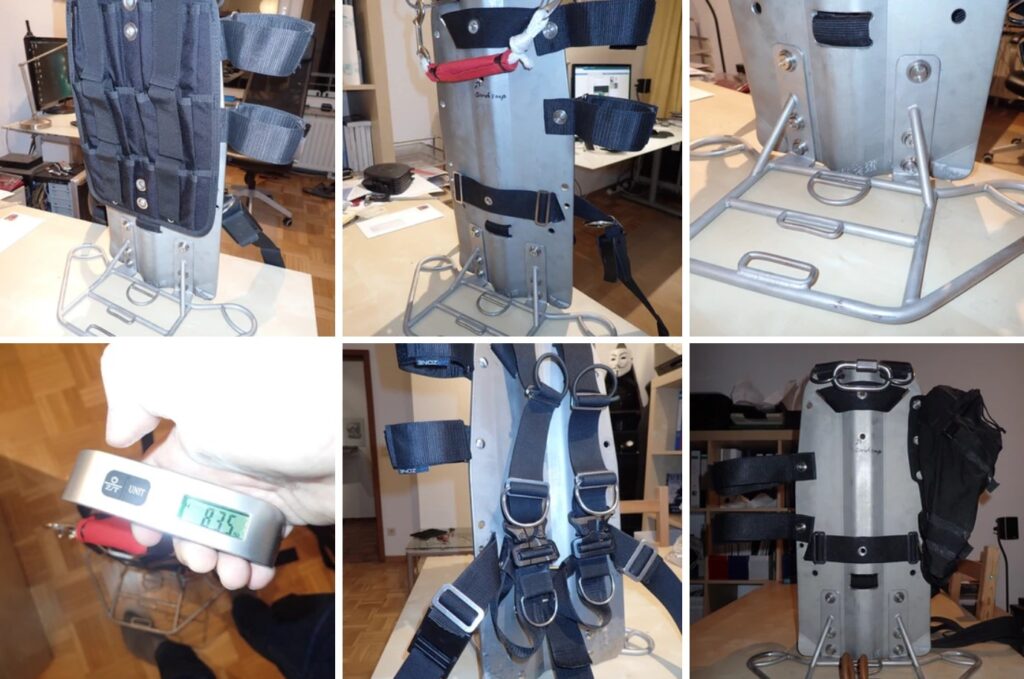
Backplate and harness combined with a stand
For the conversion to a backplate solution, the softframe was reduced to the necessary minimum and fitted with M8 bolts at the usual 11-inch spacing. A 6 mm thick and extra-long self-made stainless steel plate from a pSCR project for cave diving served as the basis. On the one hand, the extra length meant that the device could be positioned in a way that was easy on the back, and on the other hand, a JJ-CCR stand that had been modified to meet the new requirements was mounted directly on it. With an angle of inclination of around 10 degrees, the rebreather was stable even in rough seas. A Holis SMS 100 weight system was originally intended for carrying lead weights, which was later replaced by a simple 5 kg p-weight.
The jacket modification was professionally executed by a sailmaker. This involved removing the lead pockets, buoyancy bladder, unnecessary buoyancy-enhancing foam inserts, cummerbund, and other redundant straps. The position of the large zipper was adjusted to fit the new cut. Various eyelets and additional Velcro fasteners were added for the hoses. The idea of an additional strap for compacting the whole for transportation was adopted from the Dräger “Dolphin.” A fundamental drawback of the soft frame is that its soft fabric only provided limited protection for the internal components against impacts and cuts on the edges and corners of wrecks. Mounting a cave shield was deemed too challenging, and the risk was accepted since most wrecks in the North and Baltic Seas are too decayed to penetrate. Another problem arose because the soft frame allowed only a single position of bolts and could only be mounted in one position on the backplate, thus losing all adjustment options. Compared to the original device, “X-Ray” sat noticeably lower on the back, necessitating later extension of the breathing hose. A 17-liter donut bladder with an eccentric cut (providing less buoyancy in the neck area) served as the new buoyancy device. In the chosen model of Tecline SE-Donut, the inflator fold hose sat centrally and was therefore not covered by the soft frame. Later, the water position was intended to be improved by using a “Sentinel” rebreather’s donut bladder, but this never happened.
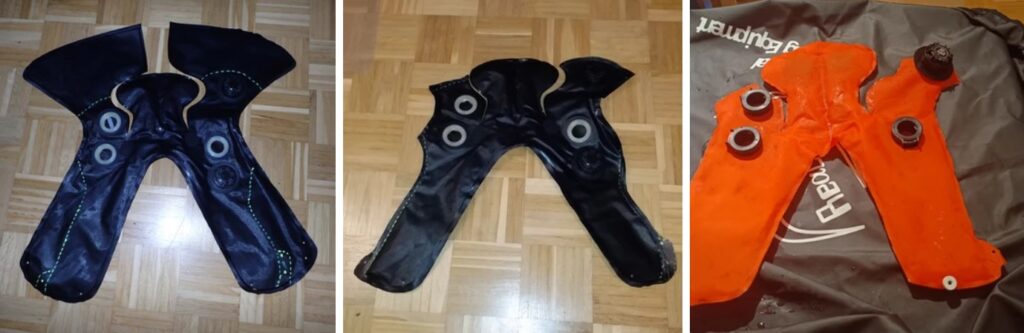
The fitting procedure for counterlungs
Counter lung
The counter lung was positioned in the shoulder area and represented a hybrid between backmount and frontmount solutions. Its original total capacity was 12 liters. This made it practically impossible for the gas mixture in the loop to become hypoxic even under maximum load in an aSCR (active semi-closed Rebreather), which theoretically is one of the greatest risks with this type of device. For use in an mCCR (manual closed circuit rebreather), this counter lung was hopelessly oversized. Especially the huge water traps in the back area caused additional buoyancy and worsened the already suboptimal water position. For the first “X-Ray” Mk.1 prototype, two original counter lungs were professionally reduced in capacity to approximately 5.5 to 6 liters (based on my lung vital volume of 5.8 liters) by the company Sidemount Explorer. A nice feature of the “Ray” counter lung was the small drainage holes with blind screws, which made equipment cleaning much easier. For Mk.2, a custom-made counter lung was made from a better weldable and more flexible material, originally used in sidemount rebreathers. Due to the increased flexibility of the material, the length of spiral hose inside the lungs had to be doubled to prevent collapsing under pressure. What worked well with relatively simple sidemount lungs led to problems with the complex geometry of the “X-Ray” lungs, so a switch back to the original solution was made later in the project.
The scrubber, ADV housing, and loop are connected to the counter lung using Dräger P-port quick couplings. There were two versions of the Dräger “Ray” with a different number of overpressure valves in the counter lung. The CE version used in the “X-Ray” Mk.1 had one valve on the back and an additional one on the shoulder. The older INT version was the basis for the Mk.2 and had the exhaust valve only on the back, where it is not accessible to the diver during the dive. However, this valve (a conventional drysuit exhaust valve from Apeks, as known from KISS and some pSCR rebreathers) was mainly responsible for adjusting the exhalation resistance. It usually did not need to be adjusted or manually operated during the dive. Instead, the loop could be emptied as needed by exhaling into the mask. Obviously, there were also differences between the CE and INT versions of the Dräger “Ray” in the design of the p-port threaded pieces, which were firmly glued to the lungs, making it sometimes very difficult to seal them tightly.
The harness shoulder straps were designed to be detachable for attaching the counter lung. Instead of fragile plastic buckles, more robust “Cobra buckles” from Scuba Force were used. In the neck area, the shoulder straps received two additional D-rings with a massive oval screw chain link as a carrying handle. The original straps and Velcro fasteners were retained for attaching the scrubber and oxygen cylinder to the soft frame. For better hose routing, an additional hose eyelet was installed in the fabric covering above the ADV in the second prototype.
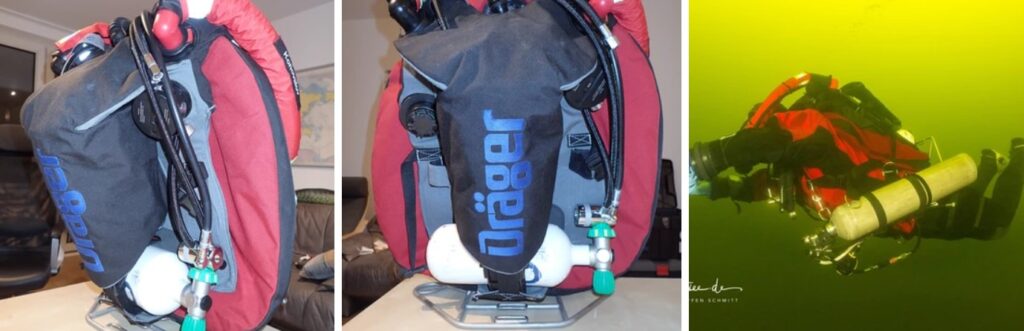
“X-Ray” Mk. 1 in ready-to-dive condition
With the heavy steel backplate, a dive-ready “X-Ray” weighed just 25 kilograms. To put it into perspective: a fully configured rEVO III Micro in the lightest configuration with a titanium frame and carbon cylinders weighed 23.5 kilograms according to the manufacturer. A JJ-CCR, on the other hand, weighed 34 kilograms. Realistically, the fully equipped “X-Ray” in the Baltic Sea configuration also had an operational weight of 34 kilograms, although an argon set, a tank light, and 5 kilograms of V-weight were already taken into account. So, there was no weight miracle, even though the result was somewhere close to a fully configured twin 7-liter set and light enough for the planned missions. Traveling was a different story. For air travel, the device received an aluminum backplate without a stand. The Sidemount weight system was mounted as an intermediate layer between the wing and the soft frame. This configuration was transport-ready at just 11 kilograms, which was lighter than the empty weight of a Mares “Horizon.” Abroad, one would then provide a dive center with rebreather support, contributing oxygen cylinders, stages, absorbent, and lead. In terms of dimensions, the “X-Ray” fell into the mid-range category: approximately 60 × 40 × 30 cm (height × width × depth). Overall, it was narrower than the comparison devices (except for the stand) but was otherwise similar in size.
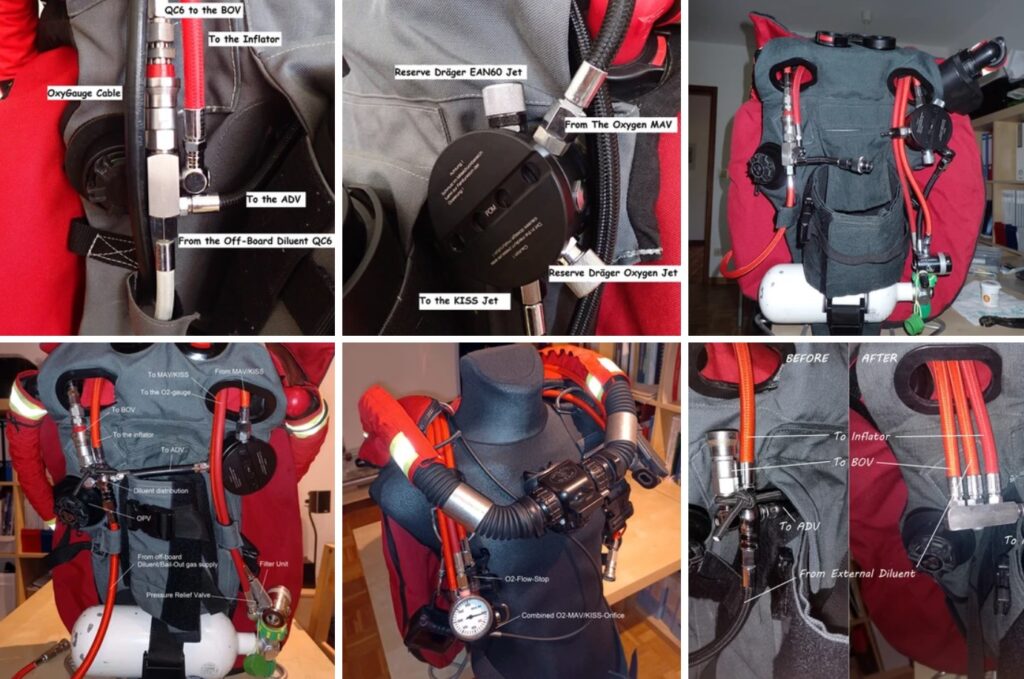
Different hose guides in the course of the project
Gas Supply
The gas supply in the original Dräger “Ray” consisted of a 4- or 5-liter cylinder with a 50% Nitrox mix, mounted horizontally under the scrubber. From this cylinder, the loop, inflator, and bailout regulator were supplied. For the safety considerations at the time and the maximum intended diving depth of 21 meters, this setup was acceptable. The horizontal arrangement was maintained in the “X-Ray,” but with a 2-liter oxygen cylinder. For particularly long expeditions, a 4-liter cylinder was still available. The diluent, which also served as bailout gas, was exclusively off-board from a stage. Since a bailout stage was always carried, it was permissible to draw 5 to 10 bar of diluent per dive from it, depending on the dive depth and cylinder size (of course, assuming reasonable gas planning) and top it up at the next opportunity. The size, content, and number of stages were adjusted to each dive. As a “side effect” of this arrangement, it was possible to dive the unit with oxygen only if necessary.
At this point, a few words should be said about the maximum depth. This is limited in the “X-Ray” due to the very small axial scrubber with a capacity of 1.5 liters. At the time of the “Ray” introduction, the official duration of this lime fill was about 70 minutes (at 40 l/min ventilation, 4°C water temperature, 1.6 l/min CO2 addition, and Dräger DiveSorb lime). Since 2001, the manufacturer has approved the device for a duration of up to 110 minutes (at 30 l/min ventilation and 1.2 l/min CO2 addition). Taking into account this duration and with a bottom time of 30 minutes, the “X-Ray” with a best mix yielded a maximum dive depth of about 70 meters. 45 minutes of bottom time meant a maximum depth of 55 meters, 60 minutes 40 meters, etc. The decision against a lime cartridge with a larger capacity was made for logistical and weight reasons. It seemed more sensible to have a pre-filled and sealed spare cartridge in the diver’s box rather than carrying one on the back that was oversized for the planned missions.
Nitrox injection in the “Ray” was done through a lung-automatic valve with a built-in nozzle and a dosage of 8.25 l/min. This valve was mounted in a bypass housing with a single threaded connection. Fortunately, this housing could be directly replaced by the bypass of the Dräger “Dolphin,” which offered more than enough connection options. In the ADV housing of the first prototype, the following parts were installed: a lung-automatic valve from the “Dolphin” as an ADV, a KISS nozzle, an oxygen supply from the MAV, and two nozzles from the “Dolphin” (EAN 60 and oxygen). The idea behind this was to operate the unit with a reserve nozzle in case of primary oxygen supply failure (which was only permissible with reduced dive depth due to a high flow of 1.0 to 1.4 l/min O2), or to convert it back to an aSCR under field conditions with few adapters (keyword “Graceful Degradation”). A significant emphasis was placed on repairability of the device. This led to a variety of additional couplings and adapters, some of which proved to be unreliable and unnecessary and were subsequently removed.
The ADV housing was left in its original position behind the right shoulder blade. To realize the shortest hose routes possible, the first stage of the oxygen cylinder was initially connected directly to the KISS nozzle. Unfortunately, this meant there was no way to control the oxygen flow except by opening and closing the cylinder valve. A filter unit before the nozzle was also missing initially. The arrangement of the KISS nozzle in the ADV housing, combined with the overall lower position of the soft frame on the back, made it more exposed to moisture from the counter lung compared to the “Ray.” Overall, the water tolerance of the system decreased due to the drastic reduction in lung size, so saliva and condensate often entered the interior of the ADV housing when getting up after the dive, causing corrosion damage to the internal parts of the valve over time. Since the problem existed at the conceptual level, a solution could not be found until the end.
Later, the oxygen layout was changed by replacing a combination of a pure MAV and separate KISS nozzle with an MAV containing an integrated KISS nozzle. At the same time, a flow stop and sintered filter were installed in front of the KISS valve. Depending on the project phase, “0.003” and “0.0025” nozzles were used. A conventional Apeks DS4 was used as the first stage of the oxygen system. For constant flow use, its spring was reinforced, and the dry chamber was closed with a fixed lid to maintain the intermediate pressure regardless of depth. Depending on the nozzle and desired oxygen flow, the (individual) oxygen dosage ranged from 13.5 to 20 bar and was set at 0.65 l/min.
Diluent injection from the stage was done through a Swagelok QC6 coupling with a flow stop mounted on the cylinder side. The gas was then directed through a triple manifold to the ADV, wing inflator, and BOV. Despite a perceived weakness (single point of failure), supplying all three consumers from the same source posed a low safety risk. Each diluent stage already had a lockable lung automatic, an overpressure valve, and an inflator hose. The ability to lock the regulator was used to prevent unnoticed gas leakage (e.g., when using scooters). When diving with a drysuit, an argon set was used. For simplicity, a diluent MAV was not installed. Instead, the loop was flushed by exhaling a few breaths into the mask and allowing the ADV to respond.
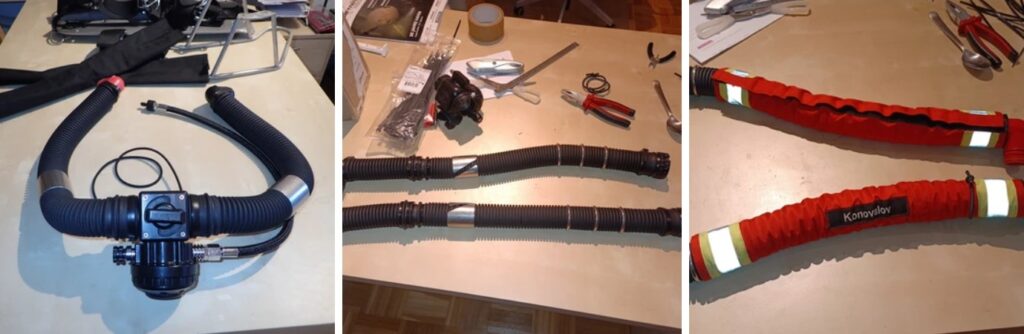
Evolution of the breathing hoses
Breathing Hoses
The flow direction in the hoses of the Dräger “Ray” (which, by the way, was also used in the rEVO along with the mouthpiece) was from the right to the left shoulder. With this arrangement, the “Ray” diver always breathed in fresh gas directly after injection, which is advantageous for a semi-closed rebreather. Since the Nitrox came pre-mixed from the cylinder, it was physically impossible to exceed the desired ppO2 as long as you stayed above the maximum allowed depth. In a CCR, this arrangement is potentially dangerous because you would inhale fresh and unmixed oxygen. Such oxygen spikes would occur especially after manual injection. For this reason, the flow direction in the “X-Ray” was reversed, and the gas had to pass through the counter lungs and the lime cartridge before being inhaled. A drawback of this solution was the aforementioned accumulation of saliva in the counter lung near the entrance to the ADV housing.
The original “Ray” DSV was quickly replaced by a BOV (first by a used “Golem-BOV” and after its failure by the proven “Shrimp”), which was considered an essential contribution to diver safety. Initially, the supply line to the BOV was detachably executed in the area of the diluent manifold with another QC6 coupling. This allowed the entire loop with all hoses to be removed from the device as a single assembly and cleaned within seconds. Later, this arrangement was replaced with a conventional 9/16 UNF regulator screw coupling to reduce the number of components used. Due to the changed position of the device on the back, the breathing hose had to be extended by approximately 10 cm. Only then did it achieve a reasonably low resistance when turning the head.
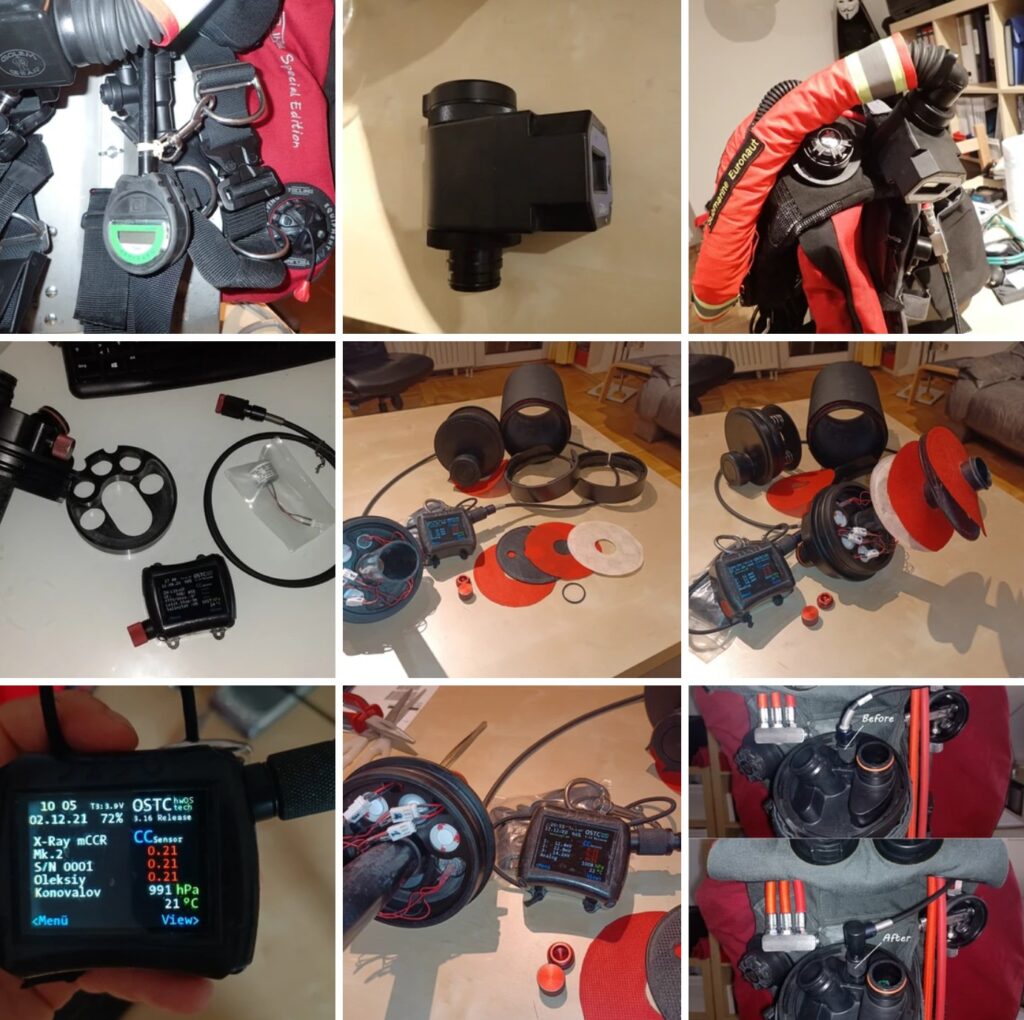
Development stages in oxygen monitoring
Sauerstoffüberwachung
Oxygen Monitoring
Incorporating a state-of-the-art oxygen monitoring system presented one of the greatest challenges in this project. The original Dräger devices were delivered without oxygen monitoring. They were designed so that even without knowledge of the oxygen partial pressure, one could dive safely within prescribed depth limits. This was one of the biggest advantages of an aSCR over a CCR. Optionally, a Dräger OxyGauge could be installed as a simple oxygen monitor with a single sensor. In the “Ray,” the designated P-port for this purpose was located extremely unfavorably at the lowest point of the scrubber and was predisposed to collecting moisture. Therefore, this P-port was used for oxygen supply in most mCCR conversions. In the “X-Ray,” a blind plug sat in this position. For the Dräger “Dolphin,” there was the option to wirelessly connect a Uwatec “Aladin Air Z O2” dive computer to an oxygen monitor specially designed for this rebreather. Such a Uwatec “Oxy2” monitor was retrofitted for the “X-Ray” from threaded connections to P-ports and mounted between the loop and the counter lung. This solution was actually only introduced for the initial testing phase, as it had some obvious drawbacks. It used only two oxygen sensors, which was insufficient for an mCCR. Moreover, the bulky sensor housing on the shoulder was exposed to impacts and entanglements. Additionally, the wireless connection to the dive computer at this location was not reliable enough. Furthermore, the dive computer itself used a very old and conservative decompression model that was also non-adjustable. Moreover, the computer algorithm written for SCR operation did not favor rapid ppO2 jumps, such as those occurring in mCCR, for example, after manual oxygen injection. Despite these shortcomings, this oxygen monitoring served as a good and quickly retrofittable backup. During the COVID-19 period, when sensors for the actual oxygen monitoring were unavailable, a planned “Oxy2” intended as a temporary and backup solution lasted for over 80 hours and made testing of both “X-Ray” prototypes possible. But even later, the old monitoring system saved the day several times when something was amiss with the later installed oxygen monitoring: simply plug in the “Oxy2” between the counter lung and the loop with two handles and be dive-ready again in a few seconds.
As a permanent solution for a CCR, oxygen monitoring with three sensors and a modern wired handset was necessary. Third-party sensor housings available for Dräger “Ray” were similar in size to “Oxy2” and intended solely for the same unfavourable installation position on the shoulder. Instead, in the “X-Ray,” a compact solution specifically developed and built for this project was used in the original scrubber head. This sensor unit, together with a variety of special adapters and custom parts, came from TecMe. The drawback of this construction was the arrangement of the sensors, plugs, and cables in the moist environment of the lime cartridge, as it was the only installation option possible without a newly designed scrubber. The deposition of conductive moist lime powder on the conductors was prevented by retrofitting with a thin, water-repellent polypropylene filter fabric and by sealing solder contacts with “Aqua Sure.” The cable entry into the head was sealed with a potting compound for electronic components. Although condensation formation in the head was not completely prevented, and the sensors were unusually placed on the exhalation side, the breathing gas was cooled on its winding path through the counter lung to the extent that the condensation water precipitated in the water trap and settled less on the sensors. The original sensor arrangement on the inhalation side led to the pre-warmed and humidified air from the breathing lime directly reaching the much colder sensor housing after the breathing lime, resulting in condensation. Nevertheless, corrosion in the area of the sensor wiring was a persistent concern throughout the project’s entire runtime.
The oxygen injected on the exhalation side also had to pass through the labyrinth of counter lungs and arrived mixed at the sensors. Regarding the measured values, there were almost no differences in response times of the handset to changes in oxygen partial pressure compared to the sensor arrangement on the inhalation side.
The selection of the handset required a dive computer with the most robust and reliable cable connector. Therefore, here, a heinrichs weikamp OSTC cR with an S8 cable was used. Here, too, there was a special solution: The cable was also connected to the scrubber head through an S8 socket and not through a fixed cable feed-through. I simply had too many friends who had to send the entire scrubber head back to the manufacturer for a simple cable break. I didn’t want to deal with a rewiring on my own device, even though it was never necessary. A HUD was omitted due to the lack of connection space in the scrubber head and in terms of additional complexity.
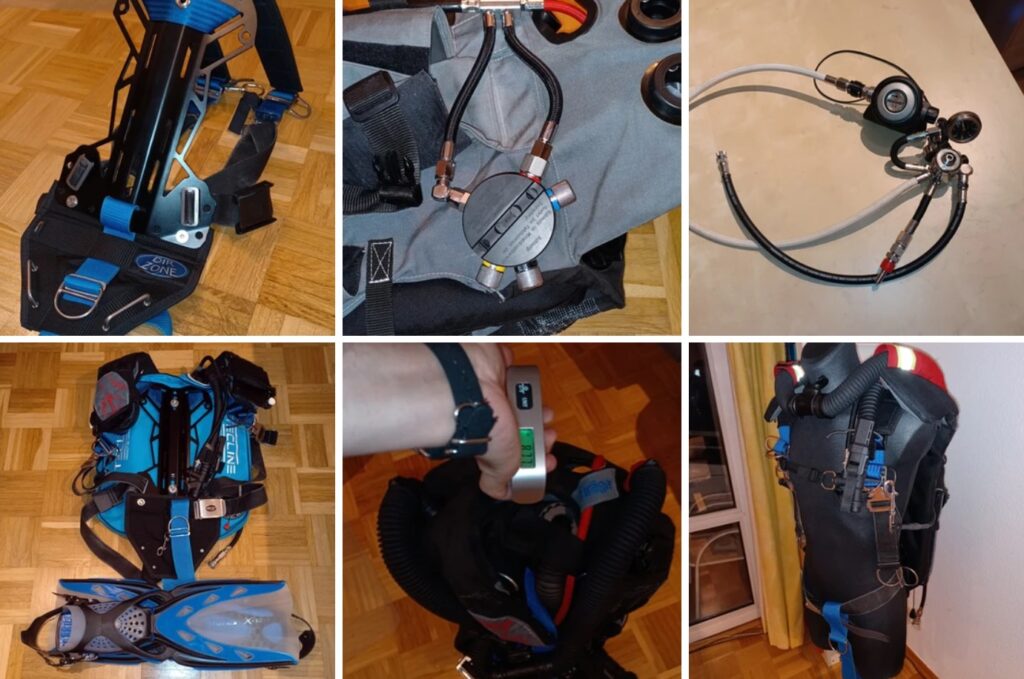
“X-Ray” Mk.3
The holiday rebreather
After completion of the “X-Ray” Mk.2, the remaining components from the first prototype were used in a semi-closed holiday rebreather (Mk.3). Essentially, it was simply the inner workings of a Dräger “Dolphin” mounted on the soft frame of an “X-Ray” Mk.1, using an aluminium backplate and a 16-litre “Peanut” wing from Tecline. The unit could use all Nitrox types from 28 to 60%, with the gas being fed from the stage, which also acted as a bail-out. The original Hollis weight system could carry up to 12 kg of weights and the overall solution weighed less than 9 kg, which meant it would fit in any flight baggage provided the regulator set was carried in hand luggage
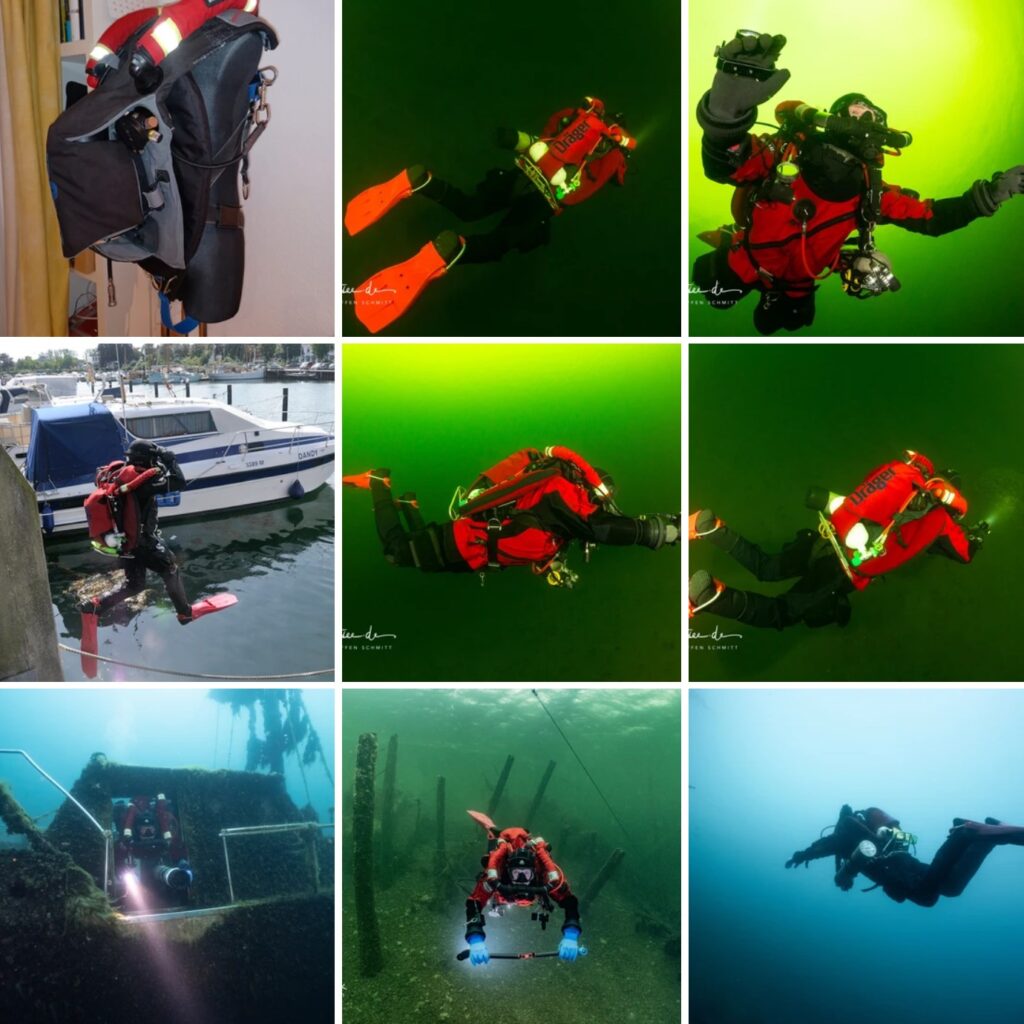
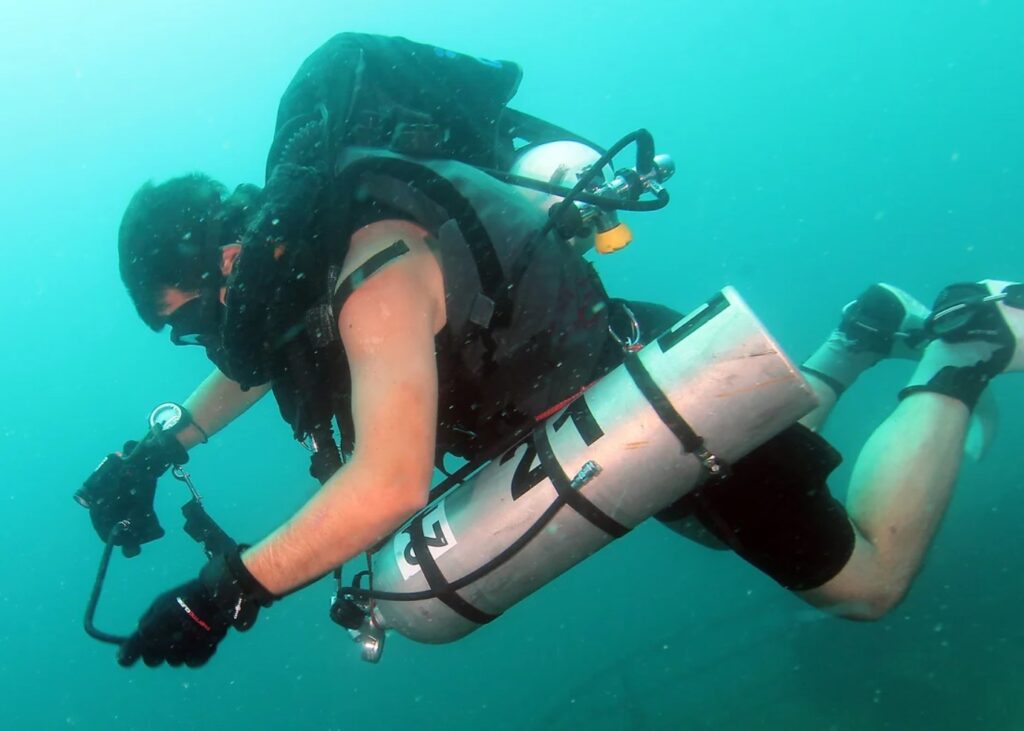
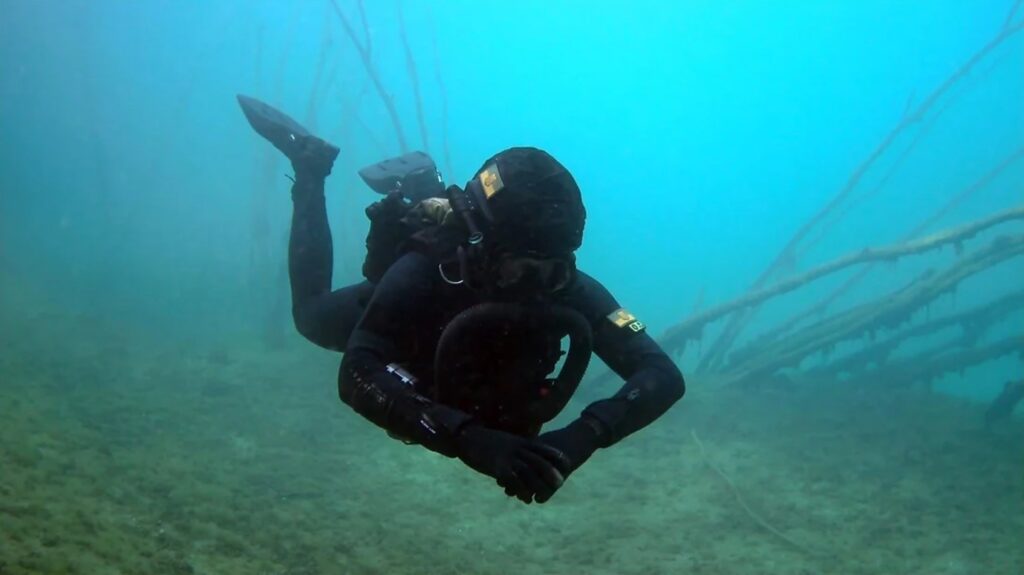
“Diving the X-Ray” Mk. 2
Conclusion
Overall, all “X-Ray” prototypes completed nearly 215 open-water diving hours from 2020 to 2022 across 250 dives. The highlight was Trimix dives in depths of up to 70 meters in Northern Norway around Narvik and Lofoten. Even during weeks of intensive use, the device proved itself well. Conditions ranged from beach dives to wreck tours on large ships and small boats, exactly the scenarios for which the “X-Ray” was developed. Unfortunately, I left the crew of the submarine “Euronaut” at the end of 2020, so the rebreather did not have the opportunity to be tested in a diver lock. Despite inevitable “teething problems,” there were no failures that permanently rendered the device undivable without being resolved on-site. This is probably also because all demanding tasks were entrusted to professionals. Surprisingly, the device did not require any weight adjustment from the first checkout dive, as the buoyancy was satisfactory from the start. Thanks to its striking color choice, the “X-Ray” was an eye-catcher at every dive site, although one sometimes had to endure comments like, “Where did you get that from? The museum?” All in all, the project result that emerged during the Corona era can be considered a technical success. However, those looking to save money through DIY are on the wrong track. The total development costs for three prototypes with everything included exceeded €10,000. Some of this was more like avoidable “tuition fees.” One had to have a high level of perseverance and frustration tolerance because setbacks were inevitable. One does not embark on such a project to own an mCCR but because they enjoy the associated challenges.
In mid-2022, I ended the “X-Ray” project for personal reasons. All prototypes were disassembled and sold, along with almost all of my diving gear. Today, I only dive open circuit (OC) and, through sidemount training, have essentially started over from scratch with diving. Nevertheless, sooner or later, there will be another trimix-capable CCR rebreather in my arsenal, although this time it probably won’t be self-built. In the meantime, some promising chest-mounted devices have entered the market or are about to. The work on the “X-Ray” has provided a wealth of experience that can be used in the future to articulate my individual requirements for a rebreather for wreck diving and evaluate available devices in this regard. Since I had no prior experience with chest-mounted devices, I continued a passion project, this time without performance pressure, which a few years ago was conceived as the “X-Ray” Mk.4. Originally, it involved a combination of a leftover original jacket from Dräger “Ray” with a chest-mounted housing from Dräger “Dolphin,” this time as a simple pure oxygen rebreather modeled after military LAR devices. Today, the whole endeavor continues as the “LARphin” project and aims to provide the first fundamental experiences with chest-mounted CCR diving. I will surely write about it one day…
To be continued…
This article was originally published in “Wetnotes” magazine no. 39
Published with permission by Alexey Konovalov.

Therebreathersite was founded by Jan Willem Bech in 1999. After a diving career of many years, he decided to start technical diving in 1999. He immediately noticed that at that time there was almost no website that contained the history of closed breathing systems. The start for the website led to a huge collection that offered about 1,300 pages of information until 2019. In 2019, a fresh start was made with the website now freely available online for everyone. Therebreathersite is a source of information for divers, researchers, technicians and students. I hope you enjoy browsing the content!